Dinosaur Kale Mac and Cheese

Because dinosaurs are cool.

Chili and Lime Black Bean Burger

The perfect vegan burger!

Beer Battered Halloumi

Nom, nom, nom.

Ginger and Chili Tofu

Crispy delicious tofu that's easy to make... say what?

Chocolate Cake Balls

Cakes, but not as you know them.

Sunday, 29 May 2011

My Mum's Vegetable Bake

People always ask me what I have with a roast dinner if I don't have meat, and as I don't really like meat subsitities my mum makes this. It's basically a very indulgent creamy, cheesy vegetable dish: proper good comfort food (I belive in it's healing properties, it's the first meal I had both times I got my lip pierced!). I've been trying to persuade my mum to cook it all week. In the end I made it, along with the first roast dinner I've managed to excecute without royally fucking something up!

So here's the recipe,

serves 6-8

glug of olive oil
1 butternut squash chopped
2 heads of broccoli (florets picked off)
250g whole shallots peeled
600g crème fraiche (said in the tone of Randy Marsh)
250g grated cheese
25g bread crumbs

To start preheat the oven to 200 degrees. Put the shallots and squash into a large frying pan with the olive oil and soften on a medium heat.

While they are softening bring some water to the boil and add the broccoli, cook for around 5 minutes, drain and place in a large dish. When the vegetables have softened add the crème fraiche and turn the heat up so that it starts to bubble. Then add most of the cheese and the bread crumbs (reserve some for the top) and mix in well until all the cheese has melted. Let the mixture simmer for around 10 minutes until it has thickened and then add it to the dish with the broccoli. Mix well and coat the broccoli in sauce and then top it with the left over cheese and breadcrumbs. Cook in the oven for 45 minutes and serve!

I had it with roast potatoes, homemade Yorkshire puddings and cabbage but it works well with any roast dinner foods. So there you have it, 7 of my favourite foods for National Vegetarian week!

Saturday, 28 May 2011

Black Bean Tofu and Garlic Fried Rice

I love tofu in black bean sauce, I get it pretty much every time I get a Chinese take away (I do try other stuff some times, but I always come back to this). It was the first thing I tried from a Chinese take away when I became vegetarian, so it hold a special place in my heart. I thought as part of my favourite things I would attempt to make it for the first time! I found a basic black bean sauce recipe on the Internet and adapted it so it was more like the one I'm used to.

Serves 2,

For the rice:
2 tbsp sesame oil
200g precooked rice
1 garlic clove minced
2 tbsp soy sauce

For the tofu in black bean sauce:

200g firm tofu
2 tbsp cornflour
240 ml vegetable stock
3 tsp rice wine
3 tsp sesame oil
3 tbsp soy sauce
2 cloves of garlic
1 large onion chopped
1 bok choy leaves separated and steam chopped
half teaspoon grated ginger
1 red pepper diced
1 small red chili chopped
6 tbsp black beans
2 tbsp olive oil

Start by pre-frying your tofu so that it's nice and crispy. Cut your tofu in to thin strips and use 1tbsp of the corn flour to coat each piece. Heat the sesame oil in a frying pan and add the minced garlic and the tofu, fry on a high heat until the tofu is crispy and golden brown. Remove from the pan and put in a bowl covered with kitchen roll to absorb the excess grease.

Then fry the the rice in the oil left over from the tofu, and add some more minced garlic if you like. Leave to fry on a medium heat, stirring regularly while cooking the sauce. Half way through cooking add the soy sauce and mix in.

Make the sauce by mixing the vegetable stock, rice wine, sesame oil, cornflour and soy sauce in a bowl. Then heat the olive oil in a large pan and add the ginger and garlic and fry gently, then add the onion and bok choy stems and stir fry for around 2 minutes. Then add the red pepper and chili and keep stir frying for another minute or so. Then add the tofu, black beans and bok choy leaves and cook for another few minutes. Add the sauce and keep stirring until it thickens. Serve the black bean tofu with the rice and enjoy!

Overall it was successful, a lot cheaper and probably healthier and I will definitely make it again rather than going to the take away! If I can just master crispy seaweed It would be perfect.

Friday, 27 May 2011

Earl Grey Scones

Of course cream tea and strawberries are some of my favourite things, they remind me of trips to the seaside and small tea shops run by old ladies. So today my friend Mike and I went on a pick your own strawberry mission, but it didn't quite go the way we planned.

The first tragedy struck when we set off to go strawberry picking in Gawcott... it was closed! And then we managed to get lost down a strange road where Mike saw some massive gates and was like 'shall we see what's behind them?'. We did of course, which led to us being 'chased' by an Army man. I've never seen Mike so scared, I was literally wetting myself laughing (If Mike sees that I've written this on the internet he will be mad because he thinks he's still after us). So, it was a pretty bad start to the day.

But then it started to get better, we found another pick your own in Towcester called Wakefield and although you couldn't go picking until mid June we thought we'd go check it out as it had a farm shop and a tea room. The farm shop was amazing with loads of different produce, cakes, preserves and most importantly cheese! I only brought some strawberry and rhubarb jam for my scones though as I couldn't really decide what I wanted.

So I was slightly devastated that we weren't going strawberry picking and Wakefield didn't even do it any more so we went to Tesco to get some strawberries (sigh). But then on the way back to my car we found that the pick your own in Gawcott was magically open! So yeah, I was delighted and we finally got to pick some strawberries.


When we got back we got to enjoy some amazing fresh British strawberries with clotted cream and homemade scones! I made my scones with the Earl Grey tea I got from Cupoftea after the tasting to give them an extra kick. Here's the recipe:

makes 12

250g self raising flour
pinch of salt
1 tsp of Earl Grey tea leaves
55g butter
150ml milk
1 egg, beaten


Preheat the oven to 180 degrees and line a baking tray with grease proof paper. Get your pestle and mortar out (I love the pestle and mortar) and grind up your tea leaves to a fine powder. Put the flour, salt, tea and butter in a bowl and rub with your finger tips until it's the consistency of bread crumbs. Stir in the sugar and milk until it forms a dough and turn out on to a floured surface. Knead lightly and pat out to about 2cm thick and cut with a cookie cutter (or upside down glass, if like me you have no cookies cutters) and place them on the baking tray. Brush the scones with the beaten egg and then bake in the oven for 15 minutes until golden. Leave to cool on a wire rack and enjoy!


I also got this tea for one mug today which is excellent for brewing the masses of tea I've brought but never use. The perfect accompaniment to a lovely scone!

Thursday, 26 May 2011

Asparagus


I can't really say that this is one of my favourite meals as tonight was the first time I've made it but asparagus is one of my favourite foods and it's also in season so I thought it would be a good one to go for. I got the recipe from BBC Good Food, but made twice as much sauce as some people suggested and added a tiny drop of truffle oil because I am addicted to the stuff. So yeah, perfect spring dish to showcase some seasonal veg and fresh flavours... Give it a try!

Tuesday, 24 May 2011

My Dad's Spicy Bean Soup

One of the reasons I've been able to commit to being vegetarian for the last 7 years is that both of my parents are fully supportive and have always looked out for new veggie recipes to cook me. My dad first made this for me when I started college 6 years ago and it's been one of my favorites since. It's really easy to make (although I've only made it once, I leave it to him) and very filling, especially with some warm crusty bread.


Serves 2 (probably serves more if you don't eat absolutely loads of it like we do)

glug of olive oil
1 onion chopped
1 red pepper chopped
3/4 pint of vegetable stock
500g passata
1 tin mixed beans
1-2 chilies chopped (depending on how hot you want it)
1 tsp of sugar

Start by softening the onion and pepper in the olive oil until translucent, then add the stock and passata and mix together. Add the beans, chilies and sugar and bring the soup to the boil mixing the ingredients together. Reduce the heat and let the soup simmer for around 30 minutes until it has thickened and serve with some crusty bread.

(I'm trying to get my mum to cook my favourite dish of hers for Sunday dinner, but she needs some more convincing)

Monday, 23 May 2011

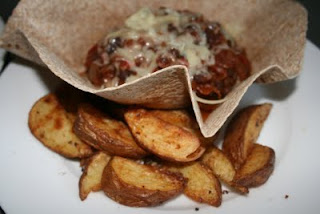
Chili Cheese Fries

So it's national vegetarian week and to celebrate I thought I'd post my favourite vegetarian meals for the next 7 days. This one comes from when I went to America about 8 years ago as a non veggie and became obsessed with chili cheese fries. And I mean really obsessed, I pretty much ate them every day, and I even managed to find some to eat at the airport just before we were about to leave. The ones they had at Disney (the best ones) were basically chips, topped with chili and burger cheese (weird plastic cheese). The only problem is that the chips go all soggy and it's obviously quite bad for you, so over the last 8 years it has evolved into this.

I made it with the chocolate and chipotle black bean chili, but you can use any vegetarian chili recipe you like. The best thing about making it this way is that you have an edible tortilla bowl, so you can dip the wedges in the chili and eat the bowl after!

Start by making the potato wedges; chop 4 potatoes into wedge shapes and boil for 10 minutes. Then spread out on a tray and spray with fry light or olive oil and cover in any seasoning you like (I used chili and garlic salt) and bake for 30-40 minutes until crispy, tossing half way through. When the wedges are about halfway through cooking start making your chili. Then to make the bowls wrap 2 tortillas around an upside down bowls places on a baking tray and cook for 6 minutes. Pour the chili into the bowl, cover with cheese and serve with the wedges on the side. (serves 2)

(My boyfriend was being artistic with his guacamole)

Sunday, 22 May 2011

Scott's Cookie Dough Cake


In the last five years I've only made my boyfriend one birthday cake and to be honest, Betty Crocker did most of the work there. So this year I wanted to make him something special and as he doesn't really like cake that much, I came up with the idea of making a cookie dough cake (he loves cookies!) by having chocolate chip icing, cookie dough in the cake mixture as well as being decorated by tiny cookies. It does take bloody ages to make, and it's not the most attractive cake in the world, but it was tasty!
For the cookies:
110g butter
110g caster sugar
65g light brown sugar
1 eggs
1/2 tsp vanilla extract
275g flour
1/2 tsp baking powder
100g milk chocolate chips

For the cake:
2 8 inch cake tin, greased
225g sugar
225g butter
225g self raising flour
4 eggs
1 tsp vanilla extract

For the icing:
140g butter
280g icing sugar
few drops of milk
100g chocolate chips

  1. First you need to make the cookies/dough so preheat the oven to 180 degrees and cream both of the sugars and the butter until light and fluffy. 
  2. Beat in the eggs and vanilla extract with an electric mixer. When well combined, mix the rest of the ingredients in a separate bowl and add to the wet mixture bit by bit until combined and cookie dough like.
  3. Take some big chunks of cookie dough and roll in to 16 balls. 8 per cake tin, I measured by placing them in the tin to guesstimate the size. 
  4. Pop them in the freezer for a minimum of 2 hours. Make the rest of the mixture in to tiny, tiny little cookie balls (see pic below) and bake in the oven for 5-7 minutes until just turning brown, you want them to be as soft as possible.
  5. Use up all of the mixture until you have loads of tiny chocolate chip cookies like this, and then turn the oven off until you're ready to make the cake.
  6. When the cookie dough is frozen solid it's time to make the cake (it's important that it is frozen otherwise it will turn to hard cookie, rather than dough inside the cake). 
  7. Preheat the oven to 180 degrees and start by creaming the butter and sugar together until light and fluffy, then beat in the egg and vanilla extract with an electric mixer. 
  8. Slowly sieve the flour into the mixture and fold in until well combined. Pour the mixture into the greased cake tins and then place the cookie dough on top of the mixture, don't worry if it's poking out, the cake will rise around it.
  9. Bake for around 30 minutes until a skewer placed in the middle of the cake comes out clean. Leave to cool for around 10 minutes in the tins, and then turn out on to a wire rack to cool completely.
  10. When cooled make the icing by beating the icing sugar and butter together until well combined, add the milk to loosen the mixture if needed and then fold the chocolate chips in.
  11.  First assemble the cake by cutting the bottom layer so it's flat and cover with a generous helping of icing, place the top layer on and then cover the whole cake. 
  12. Once covered decorate with the tiny cookies, and you should have a cake with cookie dough running through it!

Monday, 16 May 2011

Cup of Tea Tasting


Let me start this by saying that before I went to this tea tasting I knew nothing about tea, only that I like herbal and green. I think it's safe to say that afterwards, if I didn't have a memory like a sieve I would pretty much be an expert. My friend Georgie invited me to to go with her by sending me this link on face book and although I have loads of uni work still to do, I couldn't really resist.

I said before that Georgie is doing a chocolate diploma and she is also training to the a Tasting Adventure Host for Hotel Chocolat, so as part of her training she had to try another tasting experience to relate it to chocolate. So, you might think this is a bit mad and that chocolate has nothing to do with tea, but we discovered it does. My first experience of chocolate tasting was on a 3 day course when I first started Hotel Chocolat, and I loved it (who wouldn't) we tried various types of chocolate and learned how to properly taste it by smelling, snapping and eating. And my last chocolate tasting was of the Hotel Chocolat purist range with my manager, which really is interesting as they taste so different because of where they're grown, the type of bean and weather conditions. Although I couldn't take the tasting that seriously because the manager kept saying umami (I don't know why I found it so funny) and Hamwee (asparagus wee). So yeah, in relation to chocolate, some teas are single origin (beans or tea leaves only come from one area) and the process, such as fermentation affects the flavour.

I think I went off on a bit of a tangent there, so on to the tea. Christine who led the tea tasting really was an absolute authority on tea. We really liked this as you can tell that they are really passionate about the product they sell and that their teas were really top notch.

The first ones we tried were first and second flush darjeeling which basically means the first and second harvest, apparently there are 4 per year so the first one is somewhat coveted! And I'm not surprised really, Christine said it was like the Champagne of tea and it was definitely my favourite.

As I said my memory is like a sieve so I can't remember some of them, but I know that next we tried was assam. I definitely didn't like this one, we had the CTC version which you find in super market tea bags without milk and sugar. I don't like it anyway but without milk it was like drinking metal infused water. But luckily we got to have some lovely earl grey after, which was better than any I've ever tried before, really citrusy and fresh.

Then we moved on to oolong, white, green and herbal/fruit teas. I've never tried oolong or white tea before, but they were both very delicate, and as I discovered on saturday, I'm a fan of delicately flavoured teas. So, yeah, it was a very interesting day and I think if anyone is interested in tea its a great thing to try.

Monday, 9 May 2011

Atomic Burger New Menu

It's been a while since I last went to Atomic Burger, but yesterday I finally got to go to try the new menu! Again there was loads of veggie stuff, and I found it really hard to choose what I wanted, but ultimately it had to be the Frito Bandito. Nacho's in a burger... The dream!
The new menu is awesome, super colourful and retro and as before vegetarians are well catered for with loads of different burger combinations. There was loads I wanted, making deciding very hard! And there's also the option of adding or taking away any topping so you can personalise your burger.

To drink I had a sugar puff milkshake and some popping candy (I couldn't resist) and as before it was delicious. The waitress told me to be careful when adding the fiz wiz, but did I listen? Of course not, I added it all at once and it exploded!

As for the burger, it really is the best veggie burger I've ever had. The toppings just make it better, this time I had the Frito Bandito which was nachos, melted cheese, soured cream, guacamole and salsa. I also had some jalapenos because I couldn't have nachos with out them! It was true indulgence, everything I love on top of a really nice burger! I had it with a side of sci fries, which are garlic and chili coated, just too good!

My boyfriend had a meaty Daisy Duke (american cheese, BBQ sauce and bacon) and again said it was the best burger he's ever had!

So if you haven't already been, check the menu out and get yourself down there!

Saturday, 7 May 2011

Green Macaroni and Cheese


I didn't blog about the Linda McCartney competition because of my utter devastation of not winning, but it's been a few moths now... I feel ready to talk about it. As I'm having a weekend of last suppers, I have to have my ultimate favourite meal, mac and cheese. After blogging about my favourite comfort food I submitted it to the competition without really thinking and was proper shocked when it made it into the final 10! Although I didn't get through to the final 3, I am still super proud! I want to make it tonight with some garlic bread and although it contains lots of vegetables I don't really think it's healthy eating, so I will be saying goodbye to it for the next two months!

Here's the recipe on the Linda McCartney website

Friday, 6 May 2011

Oreo Stuffed Cookies

So as part of my last weekend of being bad, I wanted to bake something truly indulgent. My friend Will send me a picture of chocolate chip Oreo stuffed cookies a few weeks ago saying: 'MAKE THESE NOW' so I thought now would be the right time! I used one pack of double stuffed Oreos and one pack of chocolate cream. They both worked really well but the chocolate ones broke a lot easier, so if you're going to use single stuffed you need to be gentle!

The recipe makes 24 large cookies

220g butter
225g caster sugar
130g light brown sugar
2 eggs
1 tsp vanilla extract
525g flour
1 tsp baking powder
200g bar of milk chocolate chopped up into large chunks
2 packets of Oreos

Turn the over to 200 degrees to pre heat. Start by creaming together both of the sugars and the butter until light and fluffy. Then beat in the eggs and vanilla extract with an electric mixer. When well combined, mix the rest of the ingredients in a separate bowl and add to the wet mixture bit by bit, mixing well. When combined to make a thick cookie dough, spoon enough to cover the bottom of the Oreo into your hand and flatten. Place the Oreo in the middle of the dough and then repeat for the top of the Oreo, smooth it around the cookie in your hand until it looks like this:

Then bake for 10 - 15 minutes until they look like this:

Then put the kettle on and enjoy a very indulgent cookie with your tea (unless you don't like tea, in which case you can just fatty down as soon as they come out of the oven).

Bake Sale!

This is a very belated blog post as I made these for a bake sale about weeks ago, but I thought I may as well upload them. I had to make some cakes for my mum's bake sale and after seeing Sim Wise make these beautiful ones on Project Bunker, I thought they would be perfect for kids. After doing a bit of research on the internet I found that I needed gel food colouring to make them bright, but I couldn't find them anywhere! So any way I made them with the standard cupcake mix (3 eggs, 150g butter, 150g sugar, 150g flour and 1tsp vanilla for 12) and separated the mixture into 7 bowls and added liquid food colours. They didn't turn out as well as I wanted, but I was still kind of happy with them. I think I'm going to invest in some gel food colours so that I can make some more (I realise this will not be good for the healthy eating plan mentioned in my last post!).

They were a lot more colourful before I baked them!

I decorated them with frosting and skittles to add to the rainbow!

I also had my second attempt at cake pops, I used less frosting this time and they actually stayed on the sticks! They all got sold, so I'm assuming they were successful! I'm off to bake some oreo stuffed cookies now, so they should be up later!


Twitter Delicious Facebook Digg Stumbleupon Favorites More